前言
好久没写浅谈系列的文章了,正好最近正在整理 Aop 相关的资料,之前也写过 DI 和 IoC 的文章,想想还是直接写一篇文章输出下。
寫文的好處嘛,就是一堆你以為已經懂的東西,結果根本是一知半解。 - 来源
什么是 Proxy?
在讲 Aop 之前还是需要先讲讲 Proxy。
Proxy (代理) 是实现 Aop (切面) 的基础,使用代理方法我们可以在不修改原始类的情况下增加一些功能,这个行为一般称之为装饰,不过和装饰模式不同的是装饰模式是动态的装饰原始类,可以通过切换不同的装饰器做到不同的效果,在 Java 中,常见的代理有三种:
- 静态代理:使用代理模式实现
- Jdk 代理:使用 Jdk 中内置的 Proxy 类实现,基于接口
- Cglib 代理:使用 Cglib 动态生成代理类,基于子类
静态代理
静态代理采用的是在代码中写好代理类的方式实现,通常使用代理模式这个设计模式规范设计,由于需要手写代理类,所以当被代理类很多的时候,那么要跟着写很多代理类,所以一般只用于对性能敏感等需要代理少量类的场景下。
Jdk 代理
Jdk 代理是一种动态代理,动态代理的好处是不需要我们手写代理类。在 Jdk 中有一个 Proxy 类我们可以通过使用这个类的 newProxyInstance 动态的创建一个代理类,我们只需要实现 InvocationHandler,就可以做到被代理类的装饰。
例子
要使用 Jdk 代理需要先准备三样代码:被代理类,被代理类实现的接口,实现 InvocationHandler 的装饰类
首先是被代理类的接口(UserServiceInterface):
public interface UserServiceInterface {
  String getUsername();
}
public interface UserServiceInterface {
String getUsername();
}然后是被代理类(UserService):
public class UserService implements UserServiceInterface {

  @Override
  public String getUsername() {
    System.out.println("执行被代理方法中");
    return "syfxlin";
  }
}
public class UserService implements UserServiceInterface {
@Override
public String getUsername() {
System.out.println("执行被代理方法中");
return "syfxlin";
}
}由于 Jdk 代理是基于接口的,所以最少需要实现一个接口
最后是实现 InvocationHandler 的装饰类:
import java.lang.reflect.InvocationHandler;
import java.lang.reflect.Method;

public class UserInvocationHandler implements InvocationHandler {
  final UserServiceInterface userService;

  public UserInvocationHandler(UserServiceInterface userService) {
    this.userService = userService;
  }

  @Override
  public Object invoke(Object proxy, Method method, Object[] args)
    throws Throwable {
    System.out.println("执行被代理方法前");
    Object result = method.invoke(this.userService, args);
    System.out.println("执行被代理方法后");
    System.out.println("返回值: " + result);
    return result;
  }
}
import java.lang.reflect.InvocationHandler;
import java.lang.reflect.Method;
public class UserInvocationHandler implements InvocationHandler {
final UserServiceInterface userService;
public UserInvocationHandler(UserServiceInterface userService) {
this.userService = userService;
}
@Override
public Object invoke(Object proxy, Method method, Object[] args)
throws Throwable {
System.out.println("执行被代理方法前");
Object result = method.invoke(this.userService, args);
System.out.println("执行被代理方法后");
System.out.println("返回值: " + result);
return result;
}
}执行的方法:
import java.lang.reflect.Proxy;

public class Main {

  public static void main(final String[] args) {
    UserService userService = new UserService();
    UserServiceInterface proxyInstance = (UserServiceInterface) Proxy.newProxyInstance(
      Main.class.getClassLoader(),
      UserService.class.getInterfaces(),
      new UserInvocationHandler(userService)
    );
    System.out.println(proxyInstance.getUsername());
  }
}
import java.lang.reflect.Proxy;
public class Main {
public static void main(final String[] args) {
UserService userService = new UserService();
UserServiceInterface proxyInstance = (UserServiceInterface) Proxy.newProxyInstance(
Main.class.getClassLoader(),
UserService.class.getInterfaces(),
new UserInvocationHandler(userService)
);
System.out.println(proxyInstance.getUsername());
}
}代码很简单,这里就不解释了,我直接贴结果吧:
- 执行被代理方法前
- 执行被代理方法中
- 执行被代理方法后
- 返回值: syfxlin
- syfxlin
可以看到,我们通过装饰类 “偷偷” 在方法前和方法后插入了一些代码,生成的代理类的工作是 Jdk 动态完成的。
原理
当我们调用 Proxy.newProxyInstance 的时候 Jdk 会调用 ProxyGenerator 的 generateProxyClass 方法,该方法返回 byte 数组,这就是动态生成的代理类,我们可以把 byte 输出成 class 文件,然后使用 Intellij IDEA 反编译查看该类。
下面是生成代理类 class 文件的代码:
import java.io.File;
import java.io.FileOutputStream;
import java.lang.reflect.Method;
import java.lang.reflect.Modifier;
import java.util.List;

public class Generator {

  public static void main(final String[] args) throws Exception {
    final Class<?> proxyGeneratorClass = Class.forName(
      "java.lang.reflect.ProxyGenerator"
    );
    final Method generateProxyClass = proxyGeneratorClass.getDeclaredMethod(
      "generateProxyClass",
      ClassLoader.class,
      String.class,
      List.class,
      int.class
    );
    generateProxyClass.setAccessible(true);
    byte[] classBytes = (byte[]) generateProxyClass.invoke(
      null,
      Generator.class.getClassLoader(),
      UserService.class.getName(),
      List.of(UserService.class.getInterfaces()),
      Modifier.PUBLIC
    );
    File file = new File("UserService.class");
    FileOutputStream fileOutputStream = new FileOutputStream(file);
    fileOutputStream.write(classBytes);
    fileOutputStream.flush();
    fileOutputStream.close();
  }
}
import java.io.File;
import java.io.FileOutputStream;
import java.lang.reflect.Method;
import java.lang.reflect.Modifier;
import java.util.List;
public class Generator {
public static void main(final String[] args) throws Exception {
final Class<?> proxyGeneratorClass = Class.forName(
"java.lang.reflect.ProxyGenerator"
);
final Method generateProxyClass = proxyGeneratorClass.getDeclaredMethod(
"generateProxyClass",
ClassLoader.class,
String.class,
List.class,
int.class
);
generateProxyClass.setAccessible(true);
byte[] classBytes = (byte[]) generateProxyClass.invoke(
null,
Generator.class.getClassLoader(),
UserService.class.getName(),
List.of(UserService.class.getInterfaces()),
Modifier.PUBLIC
);
File file = new File("UserService.class");
FileOutputStream fileOutputStream = new FileOutputStream(file);
fileOutputStream.write(classBytes);
fileOutputStream.flush();
fileOutputStream.close();
}
}反编译的代码这里就不全放了,我只放关键的部分:
public class UserService extends Proxy implements UserServiceInterface {
    // ...

    public final String getUsername() {
        try {
            return (String)super.h.invoke(this, m3, (Object[])null);
        } catch (RuntimeException | Error var2) {
            throw var2;
        } catch (Throwable var3) {
            throw new UndeclaredThrowableException(var3);
        }
    }

    // ...
}
public class UserService extends Proxy implements UserServiceInterface {
// ...
public final String getUsername() {
try {
return (String)super.h.invoke(this, m3, (Object[])null);
} catch (RuntimeException | Error var2) {
throw var2;
} catch (Throwable var3) {
throw new UndeclaredThrowableException(var3);
}
}
// ...
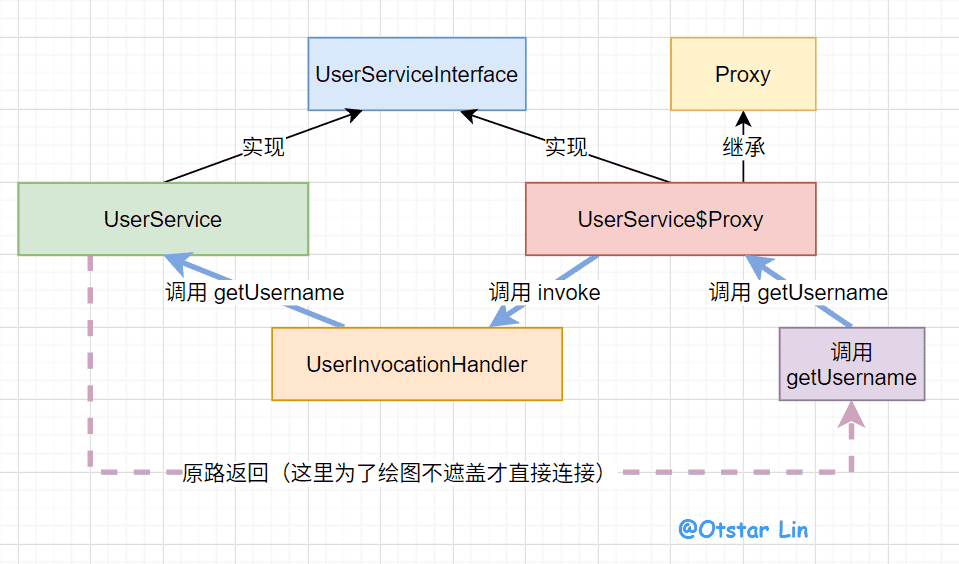
}从反编译的类中我们可以看出代理的类实现了 Proxy 类,同时继承了我们定义的 UserServiceInterface 接口,并实现了该方法,这也是 Jdk 代理只能代理有接口的类的原因。
然后是 getUsername 方法,代理类通过调用在父类定义的 InvocationHandler 中的 invoke 方法来执行具体的代码。
到这里我们梳理下流程吧:

Jdk 代理在 Jdk 中的很多地方都有用到,其中最典型就是注解,我们使用的注解其实是通过 Jdk 动态代理的方式创建对应的注解类,而注解中的属性(方法)其实并不是真实的方法返回值,而是通过动态代理从代理类中的一个隐藏 Map 属性 memberValues 中获取的,操纵了这个 Map 的值,相应方法的返回值也会跟着改变,通过这个特性我们就可以制作出同 Spring 一样的注解别名了。
Cglib 代理
Cglib 也是一种动态代理,功能和 Jdk 代理类似,不过 Cglib 使用的是继承被代理类的方式装饰被代理类,所以可以代理无接口的类。
例子
要使用 Cglib 代理,我们首先需要准备 Cglib,被代理类(UserService),实现了 MethodInterceptor 的装饰类:
Cglib 的导入这里就不写了,导入的方式有很多种,只要导入了就行了。
然后是实现了 MethodInterceptor 的装饰类:
import java.lang.reflect.Method;
import net.sf.cglib.proxy.MethodInterceptor;
import net.sf.cglib.proxy.MethodProxy;

public class UserMethodInterceptor implements MethodInterceptor {
  UserService userService;

  public UserMethodInterceptor(UserService userService) {
    this.userService = userService;
  }

  @Override
  public Object intercept(
    Object obj,
    Method method,
    Object[] args,
    MethodProxy proxy
  )
    throws Throwable {
    System.out.println("执行被代理方法前");
    Object result = proxy.invoke(this.userService, args);
    System.out.println("执行被代理方法后");
    System.out.println("返回值: " + result);
    return result;
  }
}
import java.lang.reflect.Method;
import net.sf.cglib.proxy.MethodInterceptor;
import net.sf.cglib.proxy.MethodProxy;
public class UserMethodInterceptor implements MethodInterceptor {
UserService userService;
public UserMethodInterceptor(UserService userService) {
this.userService = userService;
}
@Override
public Object intercept(
Object obj,
Method method,
Object[] args,
MethodProxy proxy
)
throws Throwable {
System.out.println("执行被代理方法前");
Object result = proxy.invoke(this.userService, args);
System.out.println("执行被代理方法后");
System.out.println("返回值: " + result);
return result;
}
}执行的方法:
import net.sf.cglib.proxy.Enhancer;

public class Cglib {

  public static void main(final String[] args) {
    final UserService userService = new UserService();
    UserService proxyInstance = (UserService) Enhancer.create(
      UserService.class,
      UserService.class.getInterfaces(),
      new UserMethodInterceptor(userService)
    );
    System.out.println(proxyInstance.getUsername());
  }
}
import net.sf.cglib.proxy.Enhancer;
public class Cglib {
public static void main(final String[] args) {
final UserService userService = new UserService();
UserService proxyInstance = (UserService) Enhancer.create(
UserService.class,
UserService.class.getInterfaces(),
new UserMethodInterceptor(userService)
);
System.out.println(proxyInstance.getUsername());
}
}代码也很简单,输出和 Jdk 动态代理的一样,这里就不细讲了。
原理
要生成 Cglib 代理类的 class 只需要设置一下系统的属性就可以了:
System.setProperty(
      DebuggingClassWriter.DEBUG_LOCATION_PROPERTY,
      System.getProperty("user.dir") + File.separator + "target"
);System.setProperty(
DebuggingClassWriter.DEBUG_LOCATION_PROPERTY,
System.getProperty("user.dir") + File.separator + "target"
);下面是生成代理类 class 文件的代码,同样删掉一些不需要关注的代码:
public class UserService$$EnhancerByCGLIB$$a8aec49d extends UserService implements UserServiceInterface, Factory {
    // ...

    final String CGLIB$getUsername$0() {
        return super.getUsername();
    }

    public final String getUsername() {
        MethodInterceptor var10000 = this.CGLIB$CALLBACK_0;
        if (var10000 == null) {
            CGLIB$BIND_CALLBACKS(this);
            var10000 = this.CGLIB$CALLBACK_0;
        }

        return var10000 != null ? (String)var10000.intercept(this, CGLIB$getUsername$0$Method, CGLIB$emptyArgs, CGLIB$getUsername$0$Proxy) : super.getUsername();
    }

    // ...
}
public class UserService$$EnhancerByCGLIB$$a8aec49d extends UserService implements UserServiceInterface, Factory {
// ...
final String CGLIB$getUsername$0() {
return super.getUsername();
}
public final String getUsername() {
MethodInterceptor var10000 = this.CGLIB$CALLBACK_0;
if (var10000 == null) {
CGLIB$BIND_CALLBACKS(this);
var10000 = this.CGLIB$CALLBACK_0;
}
return var10000 != null ? (String)var10000.intercept(this, CGLIB$getUsername$0$Method, CGLIB$emptyArgs, CGLIB$getUsername$0$Proxy) : super.getUsername();
}
// ...
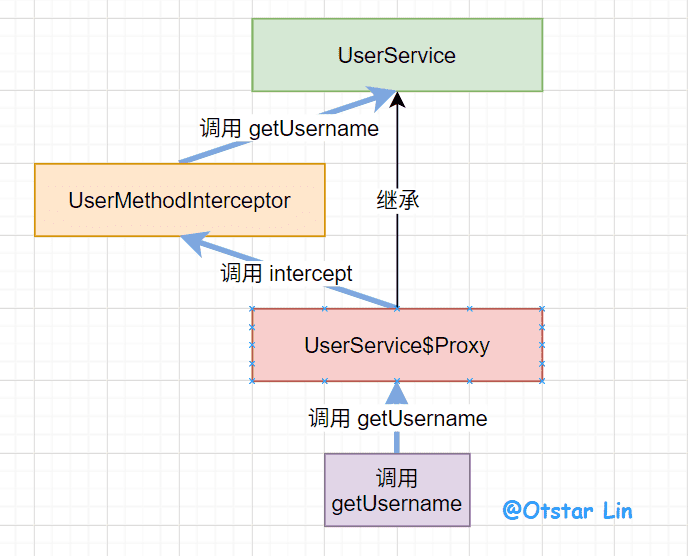
}通过上面的代码我们可以看到,代理类继承了我们的 UserService 类,同时实现了一些接口,UserServiceInterface 是我们手动传入的,如果不传入就不会出现在代理类中,不过由继承自 UserService 类,所以其实代理类也是实现了 UserServiceInterface 接口。
Cglib 代理的流程其实和 Jdk 代理差不多,也是转发到一个装饰器,然后通过这个装饰器来动态的增加一些功能。
Cglib 代理具体流程:

什么是 Aop?
如果你看过之前写过的关于中间件的文章,想必你已经知道 Aop (面向切面编程) 的作用和使用场景了,不过为了照顾到不清楚 Aop 的同学们,我还是稍微介绍下吧。
Aop 是一种设计范型,旨在将复用的逻辑抽离出来,这么说可能难以理解,我们就举个例子吧,假设我们今天要实现一个 API 鉴权的功能,如果不使用 Aop,我们为了每个 API 都能有权限验证,那么我们需要给每个 API 都增加相应的鉴权代码,这是非常丑陋的,那么我们要如何优化呢?把复用的逻辑抽出来,再进入每个 API 的业务之前对请求鉴权,而这就是 Aop 的思想和功能。
一些名称和概念
- Aspect (切面):定义了处理某段逻辑并且可模块化增强其他类的的类,比如鉴权处理、日志处理。
- Join Point (连接点):被拦截到的点,我们可以简单的理解为方法(Spring 只支持方法级别的切面)。
- Advice (通知):通知指的是拦截到某个点后要执行的代码,比如我们要在进入一个 API 的时候鉴权,就可以用 Before 的 Advice。
- Point Cut (切点):定义要增强的一系列目标对象的位置,比如通过注解标注某个方法要鉴权,那么这个方法就是一个切点。
- Target (目标对象):要被增强的对象,比如处理某段业务的 API
- Weaving (织入):即将切面和目标对象组合起来过程,可以采用动态代理的方式织入(Spring),也可以采用编译期织入(AspectJ),这里需要注意一下,Spring 虽然有可以使用 AspectJ 定义切面,不过只使用了 AspectJ 的注解,切点过滤等功能。
原理
直接跳到原理吧,例子网上随便找下 Spring Aop 就有了,这里就不在多写了,我在 Github 上也有一份简单的 Demo 代码,不想查找的也可以去看看。
Spring Aop 的切面我没仔细看过,而且也相对复杂,这里就不使用 Spring Aop 来讲解原理了。我使用的是 XK-Java Aop 的代码,这是我从 Swoft 框架抄来的并稍微魔改过的一份相对简单的代码。
首先先讲下结构吧:
- Advice 接口:定义了通知和切面接口,XK-Java 中没有采用 AspectJ 那种注解方式定义
Advice。 - AbstractAdvice 抽象类:实现了
Advice接口,子类可以继承该类而不需要实现所有Advice方法。 - CanGetTarget 接口:该接口与此次文章无关,用来实现织入后获取源对象的功能。
- AspectManager 类:切面管理器用于存储切面列表,并提供基本的缓存用于加速匹配切面。
- AspectPointcut 类:切点匹配器,使用 AspectJ 来对方法进行匹配。
- DynamicInterceptor 类:Cglib 的方法拦截器,用于将目标对象的方法代理到
AspectHandler。 - JoinPoint 类:连接点,提供一些相关的信息,如目标对象,目标方法,传入的参数等。
- ProcessingJoinPoint 类:连接点,和
JoinPoint差不多,不过增加了一个process的方法用于执行下一个切面或目标方法。 - TargetSource 类:存储了目标对象的一些基本信息,如目标对象的
Class,Interface和 目标对象。 - ProxyCreator 类:一个工具栏,用于方便的创建 Cglib 代理的对象。
- AspectHander 类:切面请求链的执行器。
由于代码量比较大,我就不细讲了,这里就说说 AspectHander 和 DynamicInterceptor 吧。
首先是 DynamicInterceptor,当执行某个被切面拦截的方法的时候,TargetSource 就会从 AspectManager 中获取已经注册好的切面,并返回匹配成功的切面列表,然后新建一个 AspectHandler 执行器,调用执行器的 invokeAspect 方法。
public class DynamicInterceptor implements MethodInterceptor, CanGetTarget {
    protected final TargetSource targetSource;

    public DynamicInterceptor(TargetSource targetSource) {
        this.targetSource = targetSource;
    }

    @Override
    public Object intercept(
        Object object,
        Method method,
        Object[] args,
        MethodProxy methodProxy
    )
        throws Throwable {
        List<Advice> advices = this.targetSource.getAdvices(method);
        Object target = this.targetSource.getTarget();
        if (advices != null && !advices.isEmpty()) {
            AspectHandler handler = new AspectHandler(
                target,
                method,
                methodProxy,
                args,
                0,
                advices
            );
            return handler.invokeAspect();
        }

        return methodProxy.invoke(target, args);
    }

    @Override
    public Object getTarget() {
        return this.targetSource.getTarget();
    }
}
public class DynamicInterceptor implements MethodInterceptor, CanGetTarget {
protected final TargetSource targetSource;
public DynamicInterceptor(TargetSource targetSource) {
this.targetSource = targetSource;
}
@Override
public Object intercept(
Object object,
Method method,
Object[] args,
MethodProxy methodProxy
)
throws Throwable {
List<Advice> advices = this.targetSource.getAdvices(method);
Object target = this.targetSource.getTarget();
if (advices != null && !advices.isEmpty()) {
AspectHandler handler = new AspectHandler(
target,
method,
methodProxy,
args,
0,
advices
);
return handler.invokeAspect();
}
return methodProxy.invoke(target, args);
}
@Override
public Object getTarget() {
return this.targetSource.getTarget();
}
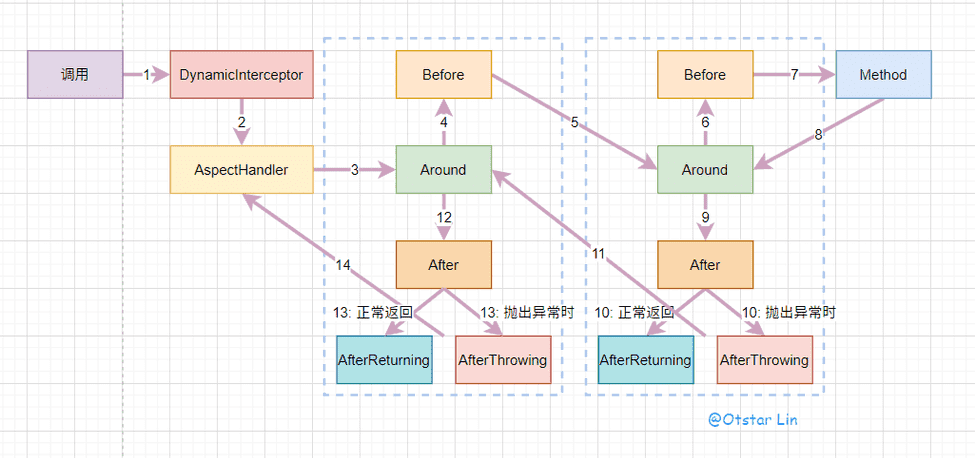
}然后是 AspectHandler,这个类是一个责任链模式的实现,具体的流程将代码后的图。
public class AspectHandler {
    protected final Object target;

    protected final Method method;

    protected final MethodProxy methodProxy;

    protected final Object[] args;

    protected int currAspectIndex;

    protected final List<Advice> aspects;

    protected Advice aspect = null;

    protected Throwable error = null;

    public AspectHandler(
        Object target,
        Method method,
        MethodProxy methodProxy,
        Object[] args,
        int currAspectIndex,
        List<Advice> aspects
    ) {
        this.target = target;
        this.method = method;
        this.methodProxy = methodProxy;
        this.args = args;
        this.currAspectIndex = currAspectIndex;
        this.aspects = aspects;
        if (this.hasNextAspect()) {
            this.aspect = this.getNextAspect();
        }
    }

    protected boolean hasNextAspect() {
        return this.aspects.size() > currAspectIndex;
    }

    protected Advice getNextAspect() {
        return this.aspects.get(currAspectIndex++);
    }

    public Object invokeAspect() throws Throwable {
        if (aspect == null) {
            return this.methodProxy.invoke(this.target, this.args);
        }
        Object result = null;
        try {
            // Around
            result = this.aspect.around(this.makeProceedingJoinPoint());
        } catch (Throwable e) {
            this.error = e;
        }
        // After
        this.aspect.after(this.makeJoinPoint(result));
        // After*
        if (this.error != null) {
            this.aspect.afterThrowing(this.error);
        } else {
            this.aspect.afterReturning(this.makeJoinPoint(result));
        }
        return result;
    }

    public Object invokeProcess(Object[] args) throws Throwable {
        // Before
        this.aspect.before(this.makeJoinPoint());
        if (this.hasNextAspect()) {
            return this.invokeNext();
        }
        return this.methodProxy.invoke(
                this.target,
                args.length == 0 ? this.args : args
            );
    }

    public Object invokeNext() throws Throwable {
        AspectHandler handler = new AspectHandler(
            this.target,
            this.method,
            this.methodProxy,
            this.args,
            currAspectIndex,
            this.aspects
        );
        return handler.invokeAspect();
    }

    public ProceedingJoinPoint makeProceedingJoinPoint() {
        ProceedingJoinPoint point = new ProceedingJoinPoint(
            this,
            this.target,
            this.method,
            this.methodProxy,
            this.args
        );
        if (this.error != null) {
            point.setError(this.error);
        }
        return point;
    }

    public JoinPoint makeJoinPoint() {
        return this.makeJoinPoint(null);
    }

    public JoinPoint makeJoinPoint(Object _return) {
        JoinPoint point = new JoinPoint(
            this,
            this.target,
            this.method,
            this.methodProxy,
            this.args
        );
        if (this.error != null) {
            point.setError(this.error);
        }
        if (_return != null) {
            point.setReturn(_return);
        }
        return point;
    }
}
public class AspectHandler {
protected final Object target;
protected final Method method;
protected final MethodProxy methodProxy;
protected final Object[] args;
protected int currAspectIndex;
protected final List<Advice> aspects;
protected Advice aspect = null;
protected Throwable error = null;
public AspectHandler(
Object target,
Method method,
MethodProxy methodProxy,
Object[] args,
int currAspectIndex,
List<Advice> aspects
) {
this.target = target;
this.method = method;
this.methodProxy = methodProxy;
this.args = args;
this.currAspectIndex = currAspectIndex;
this.aspects = aspects;
if (this.hasNextAspect()) {
this.aspect = this.getNextAspect();
}
}
protected boolean hasNextAspect() {
return this.aspects.size() > currAspectIndex;
}
protected Advice getNextAspect() {
return this.aspects.get(currAspectIndex++);
}
public Object invokeAspect() throws Throwable {
if (aspect == null) {
return this.methodProxy.invoke(this.target, this.args);
}
Object result = null;
try {
// Around
result = this.aspect.around(this.makeProceedingJoinPoint());
} catch (Throwable e) {
this.error = e;
}
// After
this.aspect.after(this.makeJoinPoint(result));
// After*
if (this.error != null) {
this.aspect.afterThrowing(this.error);
} else {
this.aspect.afterReturning(this.makeJoinPoint(result));
}
return result;
}
public Object invokeProcess(Object[] args) throws Throwable {
// Before
this.aspect.before(this.makeJoinPoint());
if (this.hasNextAspect()) {
return this.invokeNext();
}
return this.methodProxy.invoke(
this.target,
args.length == 0 ? this.args : args
);
}
public Object invokeNext() throws Throwable {
AspectHandler handler = new AspectHandler(
this.target,
this.method,
this.methodProxy,
this.args,
currAspectIndex,
this.aspects
);
return handler.invokeAspect();
}
public ProceedingJoinPoint makeProceedingJoinPoint() {
ProceedingJoinPoint point = new ProceedingJoinPoint(
this,
this.target,
this.method,
this.methodProxy,
this.args
);
if (this.error != null) {
point.setError(this.error);
}
return point;
}
public JoinPoint makeJoinPoint() {
return this.makeJoinPoint(null);
}
public JoinPoint makeJoinPoint(Object _return) {
JoinPoint point = new JoinPoint(
this,
this.target,
this.method,
this.methodProxy,
this.args
);
if (this.error != null) {
point.setError(this.error);
}
if (_return != null) {
point.setReturn(_return);
}
return point;
}
}大致的流程如下:

结语
到这里这篇文章就差不多讲完了,写了差不多 1w 字(其实还有很多是代码)肝了两个晚上,但愿这篇文章能帮到你。文中很多是我的总结,可能有一些错误的地方,如果你发现了错误欢迎在评论区反馈。
浅谈 Proxy 和 Aop
https://blog.ixk.me/post/talking-about-proxy-and-aop许可协议
BY-NC-SA
本文作者
Otstar Lin
发布于
2020/08/01
转载或引用本文时请遵守许可协议,注明出处、不得用于商业用途!
