
前不久刚把 XK-Editor 的项目结构改成了 Vue-Cli@4.x ,前端项目的变化真快呀, XK-Editor 是去年初创建的,当初的 Vue-Cli 似乎才刚要发 3.x ,然而现在已经 4.x 了。之所以要升级 Vue-Cli@4.x 是因为随着 webpack vue 等包的升级,有一些配置已经不一样了,而且也产生了一些兼容性的问题,比如 sass-loader@8.x 需要 webpack@4.x ,而如果直接将 webpack 升级到 4.x ,则会引起一连串的问题。所以升级 Vue-Cli 也是为了减少麻烦。
项目结构
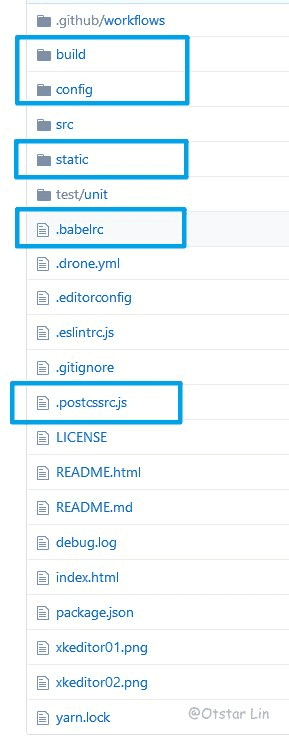
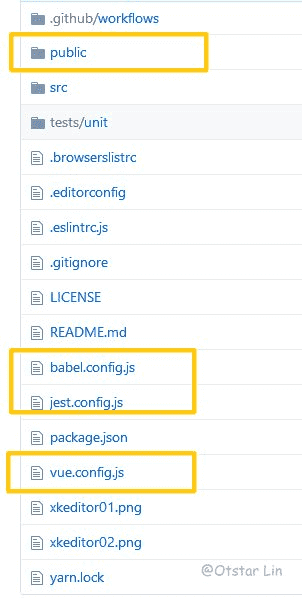
标注的文件或文件夹是各自版本特有的,在 3.x+ 中 vue.config.js , babel.config.js 和各种 config 文件替代了build config 中的配置文件以及 .babelrc .postcssrc ,这有点类似于 React 未 eject 化的项目结构
迁移方式
在迁移中, package.json 的迁移是最难解决的,我个人推荐的方式是用 vue create 创建一个项目,在创建项目的时候选择需要的模块,比如 XK-Editor 需要使用到 sass ,那么在创建的时候选中相应的模块,创建一个临时的项目文件,这样我们就可以较为轻松的得到 Vue-Cli@3.x+ 的 package.json 文件。
如果你没有添加过 devDependencies ,那么就可以将原项目的 devDependencies 直接用创建好的 package.json 文件覆盖
将创建的 package.json 的 dependencies 添加到原项目的 package.json ,同时替换 scripts ,此时 package.json 部分就完成了。
然后我们就可以开始迁移各种配置文件了,将创建的项目中的各种 [name].config.js 复制到原项目中,如果有配置过对应的配置则需要修改对应的配置文件。
创建 vue.config.js 文件,修改对应的配置,如果不需要配置 webpack 可以不用创建,比如 XK-Editor 需要使用到 webpack externals 则需要配置 vue.config.js
module.exports = {
  configureWebpack: {
    externals: {
      "ace-builds": "ace",
      marked: "marked",
      turndown: "TurndownService",
      "turndown-plugin-gfm": "turndownPluginGfm",
      prismjs: "Prism",
      "emoji-js": "EmojiConvertor",
      "tinymce/tinymce": "tinyMCE",
      mermaid: "mermaid",
      katex: "katex",
      "katex/dist/contrib/auto-render": "renderMathInElement",
    },
  },
};module.exports = {
configureWebpack: {
externals: {
"ace-builds": "ace",
marked: "marked",
turndown: "TurndownService",
"turndown-plugin-gfm": "turndownPluginGfm",
prismjs: "Prism",
"emoji-js": "EmojiConvertor",
"tinymce/tinymce": "tinyMCE",
mermaid: "mermaid",
katex: "katex",
"katex/dist/contrib/auto-render": "renderMathInElement",
},
},
};接着,我们就可以移动静态文件了,首先在项目中创建一个 pulic 目录,在 Vue-Cli@2.x 的静态文件是放置于 static 文件夹下的,而 Vue-Cli@3.x+ 取消了 static 文件夹,转而使用 public 文件夹,如果不想重新设置静态文件的 URL 则可以将 static 直接拖动到 public 目录中,然后将 index.html 拖动到 public 中。
如果需要使用 test 则需要将原项目的 test 文件夹重命名为 tests 。
最后,我们就可以开始测试项目能否正常工作了,首先删除原本的 node_modules 文件夹,然后运行 npm install 或者 yarn 安装依赖,安装完后使用 npm start 或者 yarn start 运行,此时会有很大的几率会遇到以下提示。
[Vue warn]: You are using the runtime-only build of Vue where the template compiler is not available. Either pre-compile the templates into render functions, or use the compiler-included build.[Vue warn]: You are using the runtime-only build of Vue where the template compiler is not available. Either pre-compile the templates into render functions, or use the compiler-included build.出现这种情况只需要修改下 main.js 文件中的 new Vue 即可
// vue-cli@2.x
new Vue({
  el: "#app",
  router,
  components: { App },
  template: "<App/>",
});

// 修改为 vue-cli@3.x+ 中默认的形式
new Vue({
  router,
  render: (h) => h(App),
}).$mount("#app");
// vue-cli@2.x
new Vue({
el: "#app",
router,
components: { App },
template: "<App/>",
});
// 修改为 vue-cli@3.x+ 中默认的形式
new Vue({
router,
render: (h) => h(App),
}).$mount("#app");最后,清理下原项目,按照前面的项目结构图圈出的部分删除文件或文件夹即可。
Vue-Cli@2 项目迁移日志
https://blog.ixk.me/post/vue-cli2-project-migration-log许可协议
BY-NC-SA
本文作者
Otstar Lin
发布于
2020/02/21
转载或引用本文时请遵守许可协议,注明出处、不得用于商业用途!